Expanding my craft library

It’s getting harder to find decent second-hand bookshops in central London these days so we recently took a trip to Hay-on-Wye to satisfy our cravings.  I spent a fair amount of time rummaging through any craft books I could find and managed to pick up a few interesting additions to my library. I plan on writing fuller reviews once I’ve had the chance to read them more carefully and try some projects but here’s a quick look in the meantime.

Alabama Stitch Book, by Natalie Chanin with Stacie Stukin:

Alabama Stitch book

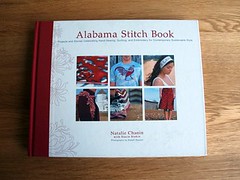
A collection of sewing projects for recycling and embellishing old t-shirts. I first heard of this book when the House on Hill Road blog reviewed the follow-up book Alabama Studio Style. Having now seen this book and the review of the second one at House on Hill Road, I think the projects in the second book are probably more to my taste but there are a couple of projects in here, including a skirt and corset top, that I do really want to try. All I need now are some t-shirts!

Designing Knitwear, Deborah Newton:

I’ve been getting more ambitious with my designing (I currently have a couple of lace shawls in progress) and my eventual ambition is to learn how to design clothing. I had seen this book recommended as a good guide to knitting design and, at a first glance, it certainly seems to cover everything you could want to know. In fact, at first glance, the sheer quantity of text and detail in this book is a little overwhelming. I think this is going to be a book that I sit down and read through rather than dipping in and out of. I’ll let you know how that goes later.

Second-hand craft books

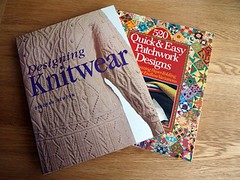
520 Quick and Easy Patchwork Designs, Kei Kobayashi:

The concept behind this book is simple: using folded origami squares as the basis for quilt designs. Take your square of paper, fold your shape, unfold the paper and use the geometric pattern of crease lines as the basis for your quilt block. My quilting has yet to progress beyond simple patchwork blocks but there’s a wealth of inspiration in here for anyone from the absolute beginner to the expert looking for something new. There is a large section on traditional American quilt block patterns, as well as variations on geometric patterns and some Art Deco and computer graphic suggestions as well. It is a design book rather than a how-to-quilt book so if you’re looking for detailed guidance on quilting, piecing and finishing quilts, this isn’t the book for you but if you’re looking for inspiration, there’s plenty of it here.

Make-do and mend – recycling a knitted jumper

Steven discovered recently that two of the smart (shop-bought) jumpers he owns have holes in the elbows.We didn’t spot them until they were well past my darning abilities and I was loth to darn them anyway because both jumpers have a hole in exactly the same place, meaning that any repair would probably wear through again quite quickly.

Steven wasn’t particularly keen on my idea of sewing suede patches on, explaining that even when he was a physicist working at a university he didn’t wear jumpers with elbow patches, but did suggest that I could unravel the jumpers and re-use the yarn. As can be seen from the label in the picture below, this was a very appealing idea.

Label showing '100% cashmere'

The first step to recycling a jumper to reclaim the yarn is to check the seams. Machine-made jumpers can be manufactured in two different ways. The first is the same as hand-knitting; the pieces are knitted to the appropriate size and shape, and then sewn together — this is ideal for unraveling as you will end up with a single, continuous length of yarn. The second is known as “cut-and-sew”. The fabric is knitted in a single large piece and then the pieces are cut out and sewn together. Unraveling a jumper made this way will result in a lot of short, individual pieces of yarn, which aren’t much good for anything. (Depending on the fibre, you could still recycling these jumpers by felting.)

The picture below is my attempt to show you what a “good” seam for unraveling looks like; it might be better to take a close look at some hand-knitted garments to get the idea.

Recycling a cashmere jumper

The next step is to unpick the seams; a sharp seam-ripper is useful but be careful not to accidentally cut the knitted fabric. The pictures below show the under-arm section of the body and the sleeve with the hole after it had been removed.

Recycling a cashmere jumper

Recycling a cashmere jumper

After unraveling, I washed and dried the yarn to get the kinks out. I had wound the into balls as I was unraveling but wound these into hanks for washing and drying. I hung the hanks to dry and hung weights from the bottom to stretch them slightly to straighten the yarn.

Recycling a cashmere jumper

It occurred to me after I had removed the sleeves (and fortunately before I had unraveled anything else) that the rest of the  jumper was still in great condition and that it could work well as a tank top, if I knitted some bands around the armholes. Now that I had a large quantity of matching yarn, I experimented a little with needle sizes and stitches, picked up a lot of stitches round the armhole and started knitting.

Recycling a cashmere jumper

I’m really pleased with the results; but K1P1 rib takes a very long time with such fine yarn on 2mm needles. Hopefully it will be finished by the autumn since it’s too warm to wear it just now anyway.

Recycling a cashmere jumper

The best bit is that, even when the armbands on this jumper are knitted, I still have another jumper to unravel (it has a round neck so can’t be turned into a tank top) plus nearly 100g of yarn from the sleeves on this one. That’s enough laceweight cashmere to keep anyone happy for quite a while!

Vintage sewing machine adventures: part 3 — the other bits

As a child, I loved rooting through my mum’s sewing basket trying to work out what all the different bits and pieces were and how they were used. No matter how much time I spent looking through that basket, there always seemed to be something that I hadn’t seen before.

Contents of the drawer

That’s why when the salesman in the junk shop showed me that the sewing machine table drawers were filled with attachments for the machine and other craft-related paraphernalia I knew I had to buy it. I’ve already talked about the sewing machine parts but here are some of my other favourite bits.

Punchcraft tool — If it hadn’t been for the fact that my mum used to have a couple of punchcraft kits, I might never have worked out was this was. Punchcraft is a way of creating pictures on fabric by “punching” yarn or thread through the fabric to create little loops. (It turns out that the tool can also be used to make holes in leather treadle belts when repairing vintage sewing machines.)

Punchcraft tool

A Turkey Rug Wool gauge — used for cutting lengths of wool to the right size for rug-making. You wind the wool round and round the gauge and then your scissors or knife slide down the groove to cut the lengths. I’ve never tried rug-making so I’ve no idea what you do after that!

Turkey Rug Wool Gauge

Turkey Rug Wool Gauge

Buttons — none that are particularly exciting but you can never have too many buttons!

Buttons

Hooks, clasps and pins — I love that some of these (and some of the buttons) have small pieces of fabric attached, showing that they’ve been saved from old clothing.

Hooks and clasps

Screws, picture hooks and curtain hooks — It’s always reassuring to see that other people end up with weird collections of DIY oddments in their craft stuff.

Assorted screws and picture and curtain hooks

Blue sequinned triangle — part of a fancy dress costume, perhaps?

Blue sequinned triangle

Vintage sewing machine adventures, part 2 – Identifying the parts

One of the first things I did with the sewing machine was to empty the drawers and sort the contents into sewing machine parts and everything else. The first picture below shows what I first thought were all the sewing machine related parts (not including bobbins, screwdrivers, needles and the lint brush since those didn’t require any research to identify).

The attachments

My next task was to work out what each of these was. Two things made this reasonably straightforward. Firstly, the sewing machine came with its manual, which has pictures of most of the parts in use.  Secondly, this is a Singer machine. All Singer parts are stamped with “Simanco” and the serial number of the part. A quick trip to Google to search for serial numbers and most of the rest were identified.

The harder part is going to be working out how to use them!

Below is a full inventory of the attachments I have with pictures and serial numbers in case this helps anyone else trying to identify parts.

Continue reading “Vintage sewing machine adventures, part 2 – Identifying the parts”