Book review – the Harmony Guides: “Lace and eyelet stitches” & “Cable and aran stitches”

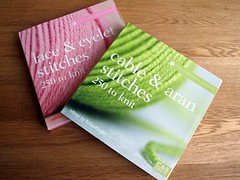
I bought these books a little while ago but having been putting off reviewing them and this week I realised why — I just don’t like them. I’ve been waiting for them to magically improve so that I can say nice things about them and it is now time to accept that this isn’t going to happen.

Harmony Guides

My first and biggest complaint is that there doesn’t appear to have been any sort of logic applied to the arrangement of stitch patterns within the books. Some sort of logical arrangement might have helped the editor spot the patterns that are repeated under different names. Not just similar patterns with a slight offset or a slightly different description of the stitches — the exact same pattern with exactly the same wording (and photograph!) just different names.

Similarly, there’s no way to find patterns by number of stitches or number of rows. This might not be such an issue with the cable and aran stitches but it makes the lace book very difficult to use other than to flick through for general inspiration.

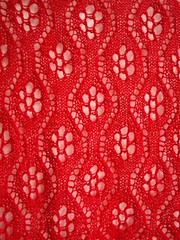
The photographs are another issue or rather the swatches are. I know how hard it can be to take a good photograph of a swatch but some of the yarn choices and particularly colours of the swatches make it impossible to appreciate the patterns. I’ve knitted a swatch for at least one pattern so far just to try and see what it looked like which defeats the purpose of them including photographs in the first place.

The lace book also has no charts, despite one of the ‘useful’ hints scattered throughout being “Take the time to learn how to read knitting charts; it’ll make your knitting that much easier”.

To end on a somewhat positive note, I will admit that there are stitch patterns in the books that aren’t in any of the other books I own, I have used some of the stitch patterns and I’ve yet to find any errors in the patterns themselves. Not exactly a glowing recommendation but I’m afraid it’s the best I can do.

Return of the cursed sweater

Remember this?
Argyle jumper

which turned into this:

Argyle jumper - undone

Well, it’s back and now it looks like this:

Argyle jumper - in progress

Not without a lot more ripping back and re-doing along the way but the front and back are now finished and will match brilliantly after a little blocking. Even better than that, the argyle worked out perfectly and the top of the top brown diamond is exactly where it’s supposed to be (and not three rows earlier, for instance).

Next step is to sew one of the shoulder seams so that I can start knitting the neckband. Given that the temperature in London is currently far too high to have an entire jumper sitting on your lap, that might not be for some time. Fortunately, if it’s too hot to sew it, it is also too hot for Steven to want to wear it!

Wishing I was in San Francisco

Mainly so that I could visit the Exploratorium at the Palace of Fine Art and see the Geometric Threads — Artisanal Takes on Pattern, Dimension, and Topology exhibit. From the website:

Explore tessellation through patterns found in quilts, Hawai’ian kapa cloth design, and Moroccan mosaic tiles. Untangle the intricacies of topology looped inside maritime knots and Korean maedeup. Move between dimensions with basket weavers, clothing designers, and upholsterers, and learn how origami artists transform flat shapes into fully realized 3D forms. Discover how similar shapes can give rise to a diversity of artistic expression, from Japanese temari to European lace and crochet.

Through master presentations, skilled artisans illuminate the mathematics inherent in mosaics, origami, and textile arts practiced across the globe.

A combination of mathematics and crafts … sounds like just my kind of thing.

New toys, sorry, tools

I bought two new craft toys tools last week; can you work out what they are from the picture? (Hint: it’s not the towels or the metre stick.)

Blocking the biscuit shawl

I’ll admit it’s not the best of pictures so how about something a little clearer:

Blocking kit

I’ve been knitting (and wearing) so many shawls that I thought it was about time I bought some blocking wires in an attempt to make blocking easier. I should say that I love the effect that blocking has, the seemingly magical difference that it makes to knitted lace changing it from scrumpled blob to beautiful shawl; I just hate the crawling about my knees while working with dozens of pins. (I also hate the waiting for things to dry but I knew even blocking wires couldn’t speed that bit up!)

So, I ordered a blocking kit from I Knit, finished (yet another) shawl and set to blocking. Initially, it seemed that the wires weren’t going to make things much quicker; feeding them into the edges of the shawl seemed to take quite a while. What was much quicker was adjusting the shawl to the size and shape that I wanted. In the past, I would pin most of the shawl out and then adjusting anything would mean moving lots of pins. Being able to just tug the wires out slightly and replace two or three pins was so much easier. It also took far less time to get the edges suitably straight, something I always struggled with before.

In short, I think I like them. I’m sure that the inserting of the wires will get easier with experience and the easier adjustment should mean that I get better results as I’m less likely to settle for “straight enough”.

The second new toy was a bit harder to work out from the picture above since it was taking the picture rather than appearing in it! Have a bad web-cam picture instead:

Camera

My trusty digital point and shoot camera died some time ago and, while we have a great digital SLR, I always felt like using it was too much effort for simple things like blog pictures and updating Ravelry. Having the SLR also meant that I didn’t feel like I should buy a new point and shoot because, well, we already had a camera. As well as that, I’m very fussy about my cameras which roughly translates to “it’s nearly impossible to find one that meets my arbitrary and sometimes contradictory criteria”. I do love Canon cameras though so when I spotted this one being sold “ex-display” in the John Lewis sale, it only took a couple of hours of pondering to actually decide to buy it. I’m glad I did though because I love it. It’s small and neat and easy to carry around with me but is also surprisingly powerful and has the functionality that I was looking for.

Expect to see the output of both the camera and the blocking wires in future!

Sneak peek – Japanese-inspired shawl

I mentioned recently that I had a couple of lace shawl designs in progress and I thought I would share a preview of one of them.

This shawl was inspired by the Japanese pattern sourcebook that I reviewed in April. The green version of the pattern is as it originally appears in the book (and on the accompanying CD).

Japanese design - green

I changed the green to red in an image editor to get a better idea of how the pattern might look in the colour of yarn that I wanted to use.

Japanese design - red

I found a flower motif in my Vogue Ultimate Knitting Guide that seemed perfect and proceeded to sketch and chart and swatch and then sketch and chart and swatch some more. I originally tried cables for the undulating lines but they weren’t showing up well in the laceweight yarn that I was using so I changed to eyelets instead and this is the final result:

Flower shawl detail

The yarn is the Plymouth Yarn Baby Alpaca Lace that I brought back from honeymoon and it’s beautifully light and soft.

What I haven’t decided yet is whether or not I will add a border. I have a couple of borders in mind but haven’t done any swatching or calculation to see which, if any, I could make fit. I’ve knitted the entire shawl (and worn it!) with just a narrow garter stitch border for now. It does curl slightly at the sides but I’m worried that adding a border will make it too fussy.

The other advantage of not adding a border is that it will make getting the pattern ready for publication much quicker! The chart is ready to go; written instructions are nearly done and I’m just waiting to be able to take some better photographs so that I can put the whole lot together.

The only other thing missing is a name! I’m still waiting for inspiration to strike so if you have any ideas, leave a comment or send me an email. If I use your suggestion, I’ll send you a free copy of the pattern when it’s published.

Pretty Pink Pincushion

Wrist band pincushion

This is quite possibly my favourite sewing project so far — pretty, pink and practical.

Wrist band pincushion

It is a simple square cushion sewn to a wristband that fastens with velcro.

Wrist band pincushion

I needed something quick and simple to regain my confidence using my sewing machine since I have a couple of large projects that I’ve been putting off. I think this has done the trick!

Wrist band pincushion

Expanding my craft library

It’s getting harder to find decent second-hand bookshops in central London these days so we recently took a trip to Hay-on-Wye to satisfy our cravings.  I spent a fair amount of time rummaging through any craft books I could find and managed to pick up a few interesting additions to my library. I plan on writing fuller reviews once I’ve had the chance to read them more carefully and try some projects but here’s a quick look in the meantime.

Alabama Stitch Book, by Natalie Chanin with Stacie Stukin:

Alabama Stitch book

A collection of sewing projects for recycling and embellishing old t-shirts. I first heard of this book when the House on Hill Road blog reviewed the follow-up book Alabama Studio Style. Having now seen this book and the review of the second one at House on Hill Road, I think the projects in the second book are probably more to my taste but there are a couple of projects in here, including a skirt and corset top, that I do really want to try. All I need now are some t-shirts!

Designing Knitwear, Deborah Newton:

I’ve been getting more ambitious with my designing (I currently have a couple of lace shawls in progress) and my eventual ambition is to learn how to design clothing. I had seen this book recommended as a good guide to knitting design and, at a first glance, it certainly seems to cover everything you could want to know. In fact, at first glance, the sheer quantity of text and detail in this book is a little overwhelming. I think this is going to be a book that I sit down and read through rather than dipping in and out of. I’ll let you know how that goes later.

Second-hand craft books

520 Quick and Easy Patchwork Designs, Kei Kobayashi:

The concept behind this book is simple: using folded origami squares as the basis for quilt designs. Take your square of paper, fold your shape, unfold the paper and use the geometric pattern of crease lines as the basis for your quilt block. My quilting has yet to progress beyond simple patchwork blocks but there’s a wealth of inspiration in here for anyone from the absolute beginner to the expert looking for something new. There is a large section on traditional American quilt block patterns, as well as variations on geometric patterns and some Art Deco and computer graphic suggestions as well. It is a design book rather than a how-to-quilt book so if you’re looking for detailed guidance on quilting, piecing and finishing quilts, this isn’t the book for you but if you’re looking for inspiration, there’s plenty of it here.

Make-do and mend – recycling a knitted jumper

Steven discovered recently that two of the smart (shop-bought) jumpers he owns have holes in the elbows.We didn’t spot them until they were well past my darning abilities and I was loth to darn them anyway because both jumpers have a hole in exactly the same place, meaning that any repair would probably wear through again quite quickly.

Steven wasn’t particularly keen on my idea of sewing suede patches on, explaining that even when he was a physicist working at a university he didn’t wear jumpers with elbow patches, but did suggest that I could unravel the jumpers and re-use the yarn. As can be seen from the label in the picture below, this was a very appealing idea.

Label showing '100% cashmere'

The first step to recycling a jumper to reclaim the yarn is to check the seams. Machine-made jumpers can be manufactured in two different ways. The first is the same as hand-knitting; the pieces are knitted to the appropriate size and shape, and then sewn together — this is ideal for unraveling as you will end up with a single, continuous length of yarn. The second is known as “cut-and-sew”. The fabric is knitted in a single large piece and then the pieces are cut out and sewn together. Unraveling a jumper made this way will result in a lot of short, individual pieces of yarn, which aren’t much good for anything. (Depending on the fibre, you could still recycling these jumpers by felting.)

The picture below is my attempt to show you what a “good” seam for unraveling looks like; it might be better to take a close look at some hand-knitted garments to get the idea.

Recycling a cashmere jumper

The next step is to unpick the seams; a sharp seam-ripper is useful but be careful not to accidentally cut the knitted fabric. The pictures below show the under-arm section of the body and the sleeve with the hole after it had been removed.

Recycling a cashmere jumper

Recycling a cashmere jumper

After unraveling, I washed and dried the yarn to get the kinks out. I had wound the into balls as I was unraveling but wound these into hanks for washing and drying. I hung the hanks to dry and hung weights from the bottom to stretch them slightly to straighten the yarn.

Recycling a cashmere jumper

It occurred to me after I had removed the sleeves (and fortunately before I had unraveled anything else) that the rest of the  jumper was still in great condition and that it could work well as a tank top, if I knitted some bands around the armholes. Now that I had a large quantity of matching yarn, I experimented a little with needle sizes and stitches, picked up a lot of stitches round the armhole and started knitting.

Recycling a cashmere jumper

I’m really pleased with the results; but K1P1 rib takes a very long time with such fine yarn on 2mm needles. Hopefully it will be finished by the autumn since it’s too warm to wear it just now anyway.

Recycling a cashmere jumper

The best bit is that, even when the armbands on this jumper are knitted, I still have another jumper to unravel (it has a round neck so can’t be turned into a tank top) plus nearly 100g of yarn from the sleeves on this one. That’s enough laceweight cashmere to keep anyone happy for quite a while!

Vintage sewing machine adventures: part 3 — the other bits

As a child, I loved rooting through my mum’s sewing basket trying to work out what all the different bits and pieces were and how they were used. No matter how much time I spent looking through that basket, there always seemed to be something that I hadn’t seen before.

Contents of the drawer

That’s why when the salesman in the junk shop showed me that the sewing machine table drawers were filled with attachments for the machine and other craft-related paraphernalia I knew I had to buy it. I’ve already talked about the sewing machine parts but here are some of my other favourite bits.

Punchcraft tool — If it hadn’t been for the fact that my mum used to have a couple of punchcraft kits, I might never have worked out was this was. Punchcraft is a way of creating pictures on fabric by “punching” yarn or thread through the fabric to create little loops. (It turns out that the tool can also be used to make holes in leather treadle belts when repairing vintage sewing machines.)

Punchcraft tool

A Turkey Rug Wool gauge — used for cutting lengths of wool to the right size for rug-making. You wind the wool round and round the gauge and then your scissors or knife slide down the groove to cut the lengths. I’ve never tried rug-making so I’ve no idea what you do after that!

Turkey Rug Wool Gauge

Turkey Rug Wool Gauge

Buttons — none that are particularly exciting but you can never have too many buttons!

Buttons

Hooks, clasps and pins — I love that some of these (and some of the buttons) have small pieces of fabric attached, showing that they’ve been saved from old clothing.

Hooks and clasps

Screws, picture hooks and curtain hooks — It’s always reassuring to see that other people end up with weird collections of DIY oddments in their craft stuff.

Assorted screws and picture and curtain hooks

Blue sequinned triangle — part of a fancy dress costume, perhaps?

Blue sequinned triangle

Vintage sewing machine adventures, part 2 – Identifying the parts

One of the first things I did with the sewing machine was to empty the drawers and sort the contents into sewing machine parts and everything else. The first picture below shows what I first thought were all the sewing machine related parts (not including bobbins, screwdrivers, needles and the lint brush since those didn’t require any research to identify).

The attachments

My next task was to work out what each of these was. Two things made this reasonably straightforward. Firstly, the sewing machine came with its manual, which has pictures of most of the parts in use.  Secondly, this is a Singer machine. All Singer parts are stamped with “Simanco” and the serial number of the part. A quick trip to Google to search for serial numbers and most of the rest were identified.

The harder part is going to be working out how to use them!

Below is a full inventory of the attachments I have with pictures and serial numbers in case this helps anyone else trying to identify parts.

Continue reading “Vintage sewing machine adventures, part 2 – Identifying the parts”