Or, in English, “Woman is fickle”. I should point out that this is a comment aimed directly at myself before I offend anyone. I changed my mind about the scarf that I’m knitting for my Mum again yesterday mostly due to the horrible cold that I’m currently suffering from. It’s become clear that because of the slightly wider width I went for, two balls aren’t going to give me a long enough scarf. I had thought I would just pick up another ball at I Knit last night but since I spent most of yesterday huddled under a blanket on the sofa, I didn’t think taking my germs to a Christmas party was a brilliant idea. So, Mum’s scarf is now going to be a neckwarmer instead.
Tag: knitting
Straying from the path
Usually, when following a knitting pattern, I use the exact yarn recommended as I’m always worried that it somehow won’t ‘work’ without it. However, having decided to knit my Mum a scarf for Christmas at the last minute and not having time to spend tracking down particular yarns, I thought it was time to be brave and try yarn substitution.
So, I picked my pattern and looked up the details of the recommended yarn on www.yarndex.com so that I could at least attempt to find something similar (a slightly fuzzy aran weight). So far so good. There was a small doubt in the back of my mind though. The photos of the scarf accompanying the pattern didn’t look like it had been knitted with aran weight yarn and definitely not with fuzzy yarn.
Undeterred, I bought two balls of the Wensleydale Longwool aran yarn, which I’ve mentioned before, and cast on.
The yarn was beautiful, the pattern pretty, the combination of the two …. bleugh!
Never mind, I had added lots of beautiful scarf patterns to my Ravelry queue earlier in the month when I thought I might eventually get around to knitting something for me again so I went back to the drawing board and started on a new pattern.
The yarn was still beautiful, the new pattern was pretty … and you can see where this is going, can’t you?
Again, despite the pattern claiming that it used aran weight yarn, that’s not what it looked like in the photos so I decided a change of approach was needed and went through my list looking for patterns that looked like they had been knitted with fuzzy aran. At last success with My So-Called Scarf.
Although all the pictures I’ve seen of this scarf have used variegated coloured yarns, the scarf looks beautiful in solid cream as well. It also uses nice big needles so is knitting up very quickly, a definite advantage when there’s less than a week to Christmas and you’re casting on a present for the 5th time!
Fingers crossed that I don’t change my mind again!
How could I forget!
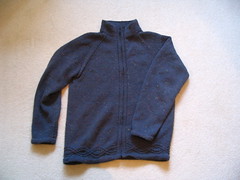
I just realised that I forgot to post to say that I finally finished the Henry scarf for my Dad! I don’t have photos yet thanks to almost never being home during daylight hours at the moment but will put some up as soon as I can.
I was beginning to worry that it wasn’t going to be done for Christmas so I’m hugely relieved. It’s come out beautifully and if it hadn’t taken so unbelievably long, I’d definitely make another one. (Sorry, Steven, there’s no way you’re getting one now.)
I made it in Jaeger Matchmaker 4 ply, which was quite nice yarn to work with although it did have a tendency to split at times. If I was going to make another one, I would be tempted to go for something softer (I wonder if Wensleydale Longwool comes in 4 ply?) and I would definitely use a more interesting colour. Charcoal grey is all well and good and my Dad will definitely wear it but it could do with a little more life in it.
Knitting Lace
Firstly, let me clear up a common misconception: knitting lace is not hard. If you can knit, purl, k2tog and make yarn overs, you can knit lace. A lace pattern might be complicated and difficult to follow but as far as technique is concerned, it’s not hard.
Unless your technique is wrong, as I discovered last night. Apparently, there is a right way and a wrong way to make yarn overs. Now yarn overs are a way of deliberately introducing holes into your knitting. Obviously, holes are very important in lace, so if you’re not making them properly, you’ve got a problem. Having knit several rows of a lace pattern and not getting anything that looked like the pictures accompanying the pattern, I decided to take a closer look at what was supposed to be happening. Clearly, the pattern pictures had holes and, just as clearly, my work didn’t. This suggested a problem with my yarn overs so I thought I’d check that I was making them the way I was supposed to.
Enter Google. The first page I found explained that there is no standard method for yarn overs so if the pattern didn’t explain how to make them, I was probably screwed. Not really what I wanted to hear so I moved right along. The next page said that (and I quote) “the yarn should be wrapped counter-clockwise around the needle looking directly at the point of the right hand needle”. Personally, I’m not terribly keen on the idea of looking directly at the points of my needles even when I’m not knitting with them. Fortunately, I was third time lucky and found a site that explained that I should be bringing the yarn to the front of my work under the needle and then putting it to the back over the needle and not the other way round as I had been doing. This method gets a very loose length of yarn wrapped over the needle (just what you need to introduce a hole) unlike the opposite way which gets you a nice neat stitch and no hole. At last I have holes in my knitting!
The final amusement was the site that explained to me that making a stitch (a yarn over increases the number of stitches by one) in this way was called ‘lace’ when done intentionally and a ‘hole’ otherwise.
A new project
I have a new favourite yarn! (I’m not sure I had a favourite before but I certainly do now.) Since Henry is very very nearly finished (just 3 rows and then the cast-off to do), I bought some yarn at I Knit last night to make a scarf/wrap for my Mum’s Christmas. The pattern that I’m making specified a slightly fuzzy aran weight and I ended up buying some Wensleydale Longwool from Wensleydale Longwool Sheepshop. This is wool as wool was meant to be! It’s 100% pure wool from Wensleydale Longwool sheep and is just beautiful. It has a lovely natural subtle sheen to it and it’s fabulously soft, unlike some other 100% wools that I’ve worked with. It’s soft and warm and fluffy and it’s definitely what I’m going to make my own scarf out of, when I get back around to making things for me.
It’s not perfect: it sheds considerably and it’s a little “grabby” so ripping back when you’ve gone wrong is not easy. Someone else at I Knit mentioned having wasted an entire ball’s worth of yarn having to rip back a jumper and the yarn being unusable afterwards. Note that I would expect both of these problems with any yarn of this sort so these are not criticisms as such.
I can’t comment on the colourways available either. I bought two balls in cream since I wanted something neutral that could be word in summer as well as winter. Since choosing yarn was standing between me and a bottle of organic cider from the I Knit fridge, I didn’t spend too long admiring things that I wasn’t going to buy! You can see (and order) other colours online at I Knit.
Of course, all this means that I have a barely-started project that I need to finish in the next 11 days. I’m also not sure that I like the pattern that I’ve chosen worked in this yarn; I think I might like something simpler given how beautiful the yarn itself is. I do have another pattern in mind so I’ll choose between them tonight and try and post some pictures over the weekend when there’s daylight.
Making progress
As can now be seen from the progress bars (currently at the bottom of the blog sidebar) I’ve made real progress on my Henry scarf. It’s now 95% done, thanks to a couple of long-ish train journeys over the weekend. I might get it finished at I Knit this week but if I don’t it certainly won’t need much more done to it. Bizarrely, I’m now starting to feel anxious about what I’m going to knit when it’s done. For all that I’ve been desperate to get it finished, I’m going to miss it when it’s gone!
Since I failed to buy my Mum a Christmas present while shopping at the weekend, it’s looking more likely that my next knitting project is going to be a present for her, despite the fact that there are now only 10 knitting days till Christmas. I think there should be laws against people having birthdays in December and January. Mum’s difficult enough to find presents for without having to find two within a fortnight.
So don’t be surprised if another progress bar appears with something for my Mum that will knit up quickly and easily and preferably with little or no seaming so that I can finish it in the car as Steven and I are driving home.
Knitty – Winter 2007 issue
Something amazing happened today. I looked at the new issue of Knitty and didn’t want to make anything in it! This almost never happens. Usually, Knitty comes out and I immediately want to run out and buy lots of wool and knit and knit and knit but not today.
I have added the kilt hose to my Ravelry queue, just in case the pattern comes in handy at a later date but that’s it.
Or, at least, that’s it for the current issue. Just to prove that there’s usually a lot more that I want to make, I trawled through the back issues and added whole bunch of earlier patterns instead. Guess you can’t win ‘em all.
Knitting tips – keeping track mid-row
This thought came as a revelation to me so apologies if it’s already occurred to everyone else: “you can use stitch markers even when the pattern doesn’t say you have to!”
I’m used to using stitch markers to mark specific points on jumpers, e.g. where the seams will be joined later, but it only recently occurred to me that I can also use them to keep track of simple repeating stitch patterns mid-row.
I’ve been working on a pattern with an extremely simple stitch pattern. How hard could it be to keep track of knit 2, slip 2 or purl 2, slip 2, even for a row with more than 400 stitches? In my case, nearly impossible! (For someone who works almost exclusively with numbers, having to admit that I was having trouble counting to two was embarassing, to say the least.)
Stitch markers to the rescue! I’ve now got stitch markers every 40 stitches and just work out at the start of every row which stitch (of the four stitch pattern) I should be at when I get to a marker. If I’m not at the right stitch, I never have to work back more than 40 stitches, which is a huge improvement over having to rip back the entire row!
This technique will work for any repeated stitch pattern. Just make sure that your markers are placed at appropriate multiples of stitches. For example, for a pattern with a repeat of 5 stitches, place markers at any multiples of 5 (5, 10, 15, 20, etc.) and, in each row, you should always be at the same stitch in the pattern when you get to a marker. Obviously, if your pattern shifts slightly from row to row, you’ll be at a different point in the pattern on different rows, but you should always be at the same point for every marker in a single row.
Knitting Tips – keeping track during pattern repeats
A really simple method of keeping track of which row of a pattern repeat you’re working on (if, for whatever reason, you don’t want to use a row counter) is to write the row numbers, e.g. 1 to 24 down the side of a piece of paper. You can then attach a paperclip to the paper that can be moved down as you work through the rows and then back to the top for the start of the next repeat.
This is fine if you know what you should be doing on each of the rows, e.g. if all the even rows are to be worked in the same way and similarly for the odd rows. What I find this most useful for though is when a pattern consists of, say, four differently worked rows that are combined in a 24 row repeat. This may result in the original pattern being written something like:
Row 1 [RS]: Stitch details for row 1.
Row 2 [WS]: Stitch details for row 2.
Row 3 [RS]: Stitch details for row 3.
Row 4 [WS]: Stitch details for row 4.
Rows 5-12: Repeat Rows 1-4 twice more.
Row 13 [RS]: Work as for Row 3.
Row 14 [WS]: Work as for Row 2.
Row 15 [RS]: Work as for Row 1.
Row 16 [WS]: Work as for Row 4.
Rows 17-24: Repeat Rows 13-16 twice more.
Repeat Rows 1-24 six times more.
So, if I’m on row 20, I need to work out which of rows 13-16 that corresponds to, then I need to look back again to find out what that actually means I should be knitting. No, thank you!
However, by copying and pasting the details for rows 1-4 into a text editor and then working through the instructions, copying the details from the appropriate row, I ended up with something like:
Row 1 [RS]: Stitch details for row 1.
Row 2 [WS]: Stitch details for row 2.
Row 3 [RS]: Stitch details for row 3.
Row 4 [WS]: Stitch details for row 4.
Row 5 [RS]: Stitch details for row 1.
Row 6 [WS]: Stitch details for row 2.
Row 7 [RS]: Stitch details for row 3.
Row 8 [WS]: Stitch details for row 4.
Row 9 [RS]: Stitch details for row 1.
Row 10 [WS]: Stitch details for row 2.
Row 11 [RS]: Stitch details for row 3.
Row 12 [WS]: Stitch details for row 4.
Row 13 [RS]: Stitch details for row 3.
Row 14 [WS]: Stitch details for row 2.
Row 15 [RS]: Stitch details for row 1.
Row 16 [WS]: Stitch details for row 4.
Row 17[RS]: Stitch details for row 3.
Row 18 [WS]: Stitch details for row 2.
Row 19 [RS]: Stitch details for row 1.
Row 20 [WS]: Stitch details for row 4.
Row 21[RS]: Stitch details for row 3.
Row 22 [WS]: Stitch details for row 2.
Row 23 [RS]: Stitch details for row 1.
Row 24 [WS]: Stitch details for row 4.
Repeat Rows 1-24 six times more.
I then printed this off and attached my handy paperclip. Now, at a single glance, I can see exactly where I am in the repeat and what I should be knitting on that row.
I love Ravelry!
For those not “in the know” (which is probably most of the world, given that Ravelry currently only has 41,000 members) Ravelry is an internet community site for knitters and crocheters. It’s still in beta testing so you can’t see much yet without signing up as a beta tester, although you will be able to browse the entire site without signing up once it goes live.
It’s difficult to describe Ravelry succinctly. I can list what it has: patterns database, yarn database, individual notebooks and project pages where users can post details of what they’re working on as well as finished items. There are also forums and a private messaging system. The big thing though is the feeling of community. Being able to look at what other people are working on, reading their comments on particular patterns or yarns and having them comment on your items is just great. It’s like having access to a huge knitting circle without having to move away from the computer.
It was actually people’s comments on my projects that sparked this post. One of Ravelry’s features is the ability to mark something as a ‘favourite’. I noticed today that two of my projects have been marked as favourites by people, one of them by two different people, and it made my day!
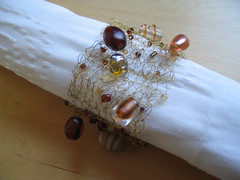
What’s even better is that those two projects are also favourites of mine. One was Steven’s Avast jumper, which I was really pleased with and which, since he wears it a lot, I guess he was really pleased with too! The other was my beaded napkin rings (a variation on the Venezia pattern from Knitty). These turned out really pretty, even though I omitted the final, fiddly step of turning them into actual rings. The ultimate compliment on these so far though has been a friend who, upon being told that they were hand-made, commented that he had assumed they were shop-bought and spent the rest of the evening peering at them intently. I can only assume he was looking for some method of telling that they were hand-made.
Pictures below, since I don’t often have an excuse to post pictures to my blog.
In other knitting news, Henry is now 57% done but feels like it’s slowing down again. I still believe I can finish it by Christmas though.