Vintage sewing machine adventures – part 1

Steven and I took a day-trip to Whitstable yesterday to celebrate my first day of freedom after the latest batch of exams. It was just supposed to be a nice trip in the car with some lunch, a wander round some shops and then home again. Except that one of the shops, a small junk shop right on the sea-front, had this:

Singer Model 15K sewing machine

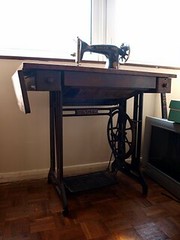
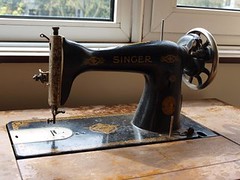
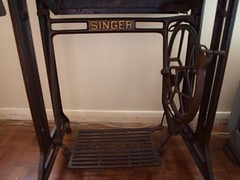
A 1940s Model 15K Singer treadle sewing machine and treadle table in what appeared to be almost working order.

Singer Model 15K sewing machine

And, yes, that is our lounge that it’s now sitting in.

The advantage of buying a Singer machine is that there is a lot of information out there on how to identify and date them. Looking up the serial number of our machine on the Singer website, I identified the type and learned that it was one of a batch of 300,000 built in Clydebank, Scotland between November 1945 and August 1946. In fact, I spent almost the entire evening reading about the history of the Singer Manufacturing Company and the factory in Clydebank.

Engraving

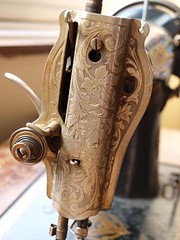
I love the detailing and aesthetic of these machines and have been admiring them from afar for years. It’s so pretty that we decided it would look great as a piece of furniture even if we never got it working, although both of us thought we’d like to see it sew something at least once. However, the more I read about these machines and how good they are for sewing and, in particular, quilting, the more tempted I am to get it fully set up and learn how to use it properly.

I don’t think it will be too difficult (famous last words!) to get it working properly again. The machine needs a new belt (already ordered), a good clean and some oil, and the woodwork needs some restoration. The ironwork just needs cleaned. The worst part is going to be removing all the dead spiders from the inside.

The treadle

The other advantage of getting it working is that it came with a wide range of different attachments for hemming, quilting, and attaching cord and bindings that would cost me a fortune to buy for my electric machine. More details of those and the other contents of the table drawers to come in my next post.

Blowing my own trumpet – but just a little

I’m not very good at self-promotion. It’s been suggested to me in the past that Scots can be “a bit backwards about coming forwards” and, while I wouldn’t like to comment on the general application of the statement, it describes me to a tee.

However, the whole point of publishing things is to share them with other people and, in a previous post, I promised to share all my publishing news so here’s the full run-down of what I’ve been up to publishing-wise and a sneak preview of what is to come.

There’s been both self-publishing and non-self-publishing so let’s start with the stuff that other people have published.

In the other post, I talked about Theresa, which was actually the second pattern that I had published in The Fibertarian; the first was my Stylish Squares blanket in their Winter 2009 edition. This was my first ever published-by-someone-who-wasn’t-me pattern and both the submission process and the publication were more than a little nerve-wracking but so exciting that I was determined to do it again, which I promptly did in their Spring 2010 edition.

p9271211.jpg

Those of you who clicked on the blanket link will have realised that it doesn’t take you to The Fibertarian site, it takes you to Yellow Ginger Designs instead. I decided that I wanted to keep a certain amount of distance between this blog (personal) and my publishing (public) and so I started Yellow Ginger Designs. The name comes from the beautiful yellow ginger plants that we saw in Hawaii. We later learned that they were actually an imported pest that the state is trying to eradicate completely but I still think they’re beautiful! (Unfortunately, the design of the site doesn’t currently live up to the beauty of its name but pretty-ing it up is definitely on my to-do list.)

Yellow Ginger

Yellow Ginger Designs will have all my self-published knitting patterns as well as sewing and other craft projects. At the moment, it’s mostly knitting patterns but I have some sewing projects and craft tutorials that just need some decent photographs before they can go up. Everything is free at the moment, but I do plan on adding a “for sale” section in future. Everything that is currently free will remain free and there will continue to be free content added.

I’ll continue to blog about craft stuff in general on this blog but any patterns or tutorials will be published over there. I will probably mention here when I’ve updated the other site but I can guarantee that, given my dislike of promotion, this blog won’t be turning into a constant stream of advertising!

Book review – Pattern Sourcebook: Japanese Style

A post-exam wander around the craft and design sections of the bookshops on Charing Cross Road today turned up a wonderful little volume entitled “Pattern Sourcebook: Japanese Style. 250 Patterns for Projects and Designs.” The book is a collection of Japanese pattern designs in nine different categories, including plants, creatures, geometry and, of course, waves.

Wave pattern

The book comes with a CD with JPEG and PSD versions of each of the patterns and, best of all, purchasing the book permits unrestricted use of any of the patterns for any purpose whatsoever without any further fees or need for acknowledgement or credit. Many of the patterns are set up so that they can be tiled in all directions.

Japanese cherry blossom pattern

There is a sentence or two accompanying each design with a short explanation of its origin or symbolism. The translation from Japanese is a little quirky at times but not enough to be distracting.

Japanese geometric pattern

The patterns are purely patterns and no instructions are given on how to use them but I’m already in danger of being overwhelmed by ideas for ways to incorporate the designs into knitting and quilting patterns.

Wave pattern

To sum up, if you’re interested in Japanese patterns and styles or just looking for a new source of inspiration, I can highly recommend this.

Details

  • Title – Pattern Sourcebook: Japanese Style
  • Author – Shigeki Nakamura
  • Publisher – Rockport Publishers

Pattern – Theresa Lace Scarf

There was just enough light left when I got home from the office to take some bad web-cam pictures of some of my more recent projects so I thought I’d get caught up on updating my Ravelry projects and actually blogging about some of these.

Theresa Lace scarf

First up is my Theresa Lace Scarf pattern that is currently available in the Spring 2010 edition of The Fibertarian (more to come later on other publishing news).

I’m going to admit upfront that I love these scarves possibly more than I should so I apologise in advance if I end up sounding like I’m selling something; I’m not on commission, honest!

The first scarf started with a rough idea in my head as a way to use up some leftover laceweight yarn. I played with some stitches from the Encyclopedia of Needlework at Project Gutenberg and Theresa was the result (named after Thérèse de Dillmont, the original author of the Encyclopedia). The second one was when I realised I was addicted.

Theresa Lace scarf

The first one (in the orangey-brown colour) was knitted using Knit Picks Gloss Lace that I brought back from honeymoon and the second (in navy) is Knitwiches 100% Pure Cashmere Laceweight. These photos really don’t do them justice but there are some better ones at The Fibertarian or on Ravelry.

Theresa Lace scarf

The pattern itself takes a little bit of concentration at first due to the slipping, lifting and re-knitting of stitches but, once you get the rhythm of it, it is almost meditative. Due to the twisted nature of the pattern, it is very difficult to frog this scarf even with relatively smooth yarn; I can only imagine it would be completely impossible with something like Kidsilk Haze.

Theresa Lace scarf

They’re wonderful to wear; very light with just a little bit of extra warmth. They can also be squashed very small to fit into bags or a pocket when even that little bit of warmth is too much. Last, but not least, they are also (unusually for something I’ve knitted) highly fashionable at the moment!

The sweater curse

I used to think that I didn’t believe in the sweater curse — the idea that if you knitted a boyfriend a jumper before you were engaged the relationship would break up shortly after. I’m now realising that there are other forms of sweater curse and I’m suffering under one of them.

My curse seems to be something like this: if I offer to knit Steven a jumper and let him pick the pattern (so that I can be sure he’ll like it) he will inevitably pick a pattern that requires a technique that is completely new to me. In the past this has included cables and inserting zips and, for the jumper that sparked today’s post, intarsia.

Argyle jumper

The jumper is the Argyll Vest (Ravelry link) from Men’s Knits by Erika Knight. I’m knitting it in Rowan RYC Cashsoft 4-ply. It’s not the most exciting pattern to knit but it is going to be a great jumper when it’s finished.

Like the other techniques that I’ve had to learn to knit Steven’s jumpers, it turns out intarsia isn’t really hard at all. Pay attention to the chart, remember to twist your yarns where the colours meet and try not to let the yarns you’re not currently using get too tangled. If only that were the only thing I had to worry about.

The back of the jumper (where there’s no pattern) knitted up very quickly, even considering it’s 4-ply yarn on 3.25mm needles.

The front, however, is a different story. The front has gone from what you see in the photograph above to this:

Argyle jumper - undone

Yes, that’s right. The front has had to be ripped out all the way back to the ribbing. Why?  Before I cast off for the under-arm, I thought to check the size of the front against the size of the back. The cast-off for the under-arm was two inches lower on the front than on the back.

I re-measured … still two inches different. I re-calculated the number of pattern repeats that I was supposed to knit on the front to get the same number of rows as I had knitted for the back … those were right. I re-counted the number of diamonds that I had actually knitted … those were right. I then repeated those three checks many, many times but every time it came out the same. I had calculated my pattern repeats correctly, I had knitted the correct number of pattern repeats and the front was still two inches shorter than the back.

The jumper disappeared into the bottom of my knitting bag, not to be seen again until a miracle happened that would result in either the front magically matching the back next time I measured, my number of pattern repeats magically turning out to be wrong (either as calculated or as knitted) or some other explanation for the problem magically presented itself.

The jumper stayed in the bag for a couple of weeks. Nothing magically fixed itself.

Then I went looking for my 3.25mm needles to swatch for another pattern.

Remember those 3.25mm needles that I mentioned above? Well, when I went looking for them, it turned out that they weren’t in this jumper after all. I had knitted the front (including all the intarsia) all the way to the under-arm on the 2.75mm needles that are used for the ribbing.

I now had my magical explanation for the missing two inches and the front of a jumper to rip out. Do you know what is hard about intarsia? Ripping it out.

Two red shawls

The number of red shawls in progress around here has risen from one to two.

The first is the Circular Shawl which, as you might be able to tell from the picture is still kicking my ass. There are four lifelines in there at the moment and I’m about to have to rip back to the last one unless I can figure out where I’ve gone wrong in the current row.

pa291398.jpg

The new needle has definitely helped with this pattern, to the extent that even if I have to rip back to the last lifeline, I’ll still have 5 completed repeats out of the 42 that the pattern suggests. I still haven’t gotten used to the level of concentration that lace knitting with all patterned rows needs though and still haven’t quite accepted that, even if inserting a lifeline is slightly fiddly, it’s still better to insert one after every repeat than have to rip back two repeats at a time. However, I am making progress and am absolutely determined that I will finish this shawl!

The second is what I’m calling my Mojo Shawl, purposefully cast on to remind me that knitting isn’t always complicated and lacking in fun. It’s Laura Chau’s Simple Yet Effective Shawl with vaguely Fibonnaci-series-based increasing sections of garter and stocking stitch. I say ‘vaguely’ because I have a bad cold at the moment and so keep forgetting to keep track of how many rows I’ve knitted in each section and am therefore just going ‘by eye’.

pa291395.jpg

The yarn for this one is some leftover Noro Cash Iroha that I had so it’s going to be nice and warm and soft and snuggly. Just perfect for wrapping yourself up in when you’re feeling under the weather.

Lace 3, Susan 0

p1011016 

I’m having my ass kicked by a shawl. I’ve tried to cast on for the Curved Shawl with Diamond Edging (Ravelry link) three times now and have yet to make it past the second row.

There is absolutely no reason why I should not be able to knit this shawl. Yes, the yarn (the Plymouth baby alpaca lace in the picture above) is skinny but the needles aren’t that small. K3tog is the most complicated stitch in the pattern so no problems there. And yet, it is just not working. To add insult to injury, the alpaca starts getting quite fuzzy after being frogged three times so I’m starting to worry about ‘wasting’ yarn.

I had decided after ripping out the third attempt that I was going to knit a different shawl instead but after a little time and reflection, I have changed my mind and am going to have (at least) one more attempt at this pattern. I’ve ordered some Knit Pro needles in the appropriate size since my interchangeables don’t go that small and I’ve convinced myself that the needles must be the problem. There’s no problem with the yarn, there’s no problem with the pattern and there can’t possibly be a problem with the knitter; can there?

Teeny tiny baby stuff

I finished the project that was distracting me from finishing the Double Vision blanket and here it is:

pa151290.jpg

It’s a baby set for my one of my best friends who gave birth to a baby girl 6 weeks earlier than expected. I had already knitted the Teddy Bear Baby blanket for this particular baby but since she was so tiny (but healthy!) I couldn’t resist the urge to knit something else. The pattern is a free pattern designed for knitting sets to be donated to a premature baby unit. The pattern itself could do with some editing; less experienced knitters might struggle with some sections. It is absolutely gorgeous when finished though. The only change I made was to add i-cord ties rather than buttons since I couldn’t find any buttons that I liked.

I bought the yarn before I knew the baby’s name and it is just absolute coincidence that they named her Heather. The yarn is RYC Cashsoft 4 ply. The colours were beautiful and the yarn was delightly soft but I’m not sure I’ll use it again. It was badly spun in places and feels like it will pill very easily. This doesn’t really matter for a baby set that baby will grow out of in about five minutes but I had considered using it for adult jumpers and changed my mind.

I have also finished knitting the squares for Double Vision and started the seaming. I’m so glad the blanket is knitted in strips and not as individual squares but, even so, there’s still a lot of seaming to be done. I’ve managed about a quarter so far and it’s looking fantastic, I just hope I don’t run out of steam before it’s done!

Home economics was never like this

The last time I took any sort of organised sewing class was back in High School. I enjoyed my home economics classes and still have some of the things that I made (including an elephant whose ears I sewed on upside down) but I wouldn’t be in a hurry to go back and do them again.

Unlike the class that I attended last night. Under guidance from Steven, his mum bought me vouchers for the Make Lounge for my birthday. To quote their website:  “The Make Lounge offers contemporary craft workshops with a stylish, social twist – perfect for embracing the ‘make do and mend’ ethic in a fashionable way!”

I took one of their intermediate sewing classes, the zippers clinic. We learned how to sew in regular zips and invisible zips and then made a little zippered oilcloth pouch. Here’s mine:

pa131283.jpg

And with the zip open, just to prove it works:

pa131284.jpg

There were wine and nibbles on hand and the atmosphere was fun and friendly. I had been a bit nervous about turning up on my own but I had a brilliant evening. I had enough vouchers for two classes so I’m already booked on the reversible handbag class next week and I can’t wait!

As well as their sewing classes, they offer crochet, jewellery-making, needle-felting, leather-working and lots of others with even more being added all the time. I realise I might be starting to sound like an advert but I promise I have no connection with them other than being a very satisfied customer!

P.S. I still haven’t finished the last two Double Vision squares and here are a couple of sneak peeks at why:

pa131286.jpg

pa131287.jpg

So near and yet so very, very far

I have now knitted 98 out of the 100 squares for my Double Vision blanket. I don’t have an updated picture since it seemed silly to spend knitting time taking photographs instead of just finishing it!

There are various reasons why I haven’t finished knitting the squares (exams, celebrating the end of the exams, recovering from celebrating the end of the exams) but I realised this week that even when I finish the squares I don’t have enough yarn to knit the border. The idea has been creeping up on me for a while but I have been firmly in denial. Now that I’m down to half of my last ball of black yarn, keeping in mind that the whole thing is knit with two strands held together so you go through yarn twice as fast, it is time to face the fact that that is not going to be enough to finish the contrasting strips between squares and knit a 5 row border all the way around.

I decided this morning that this must mean that there’s an error in the pattern and it underestimated the amount that I would need. So, I checked the pattern:

  • 150 grams each of main colours
  • 400 grams of contrast colour

400 grams? <Insert expletive here> So why did I only buy 200?

Now, I do have some niggles with this pattern. There is a bit missing in terms of knitting some of the contrast strips between squares. It’s easy to work out what to do but it is missing. Also, the method suggested for sewing the strips together isn’t actually physically possible. It has clearly been copied from another pattern without anyone checking to make sure that it was appropriate for this one, which it is not. Again, not a big deal and I really don’t need a pattern to tell me how to sew knitted strips together. It turns out though that the one thing I can’t blame the pattern for is me running out of yarn.

I have now ordered more yarn from Cucumberpatch and since I have to finish the squares and sew everything together before I knit the border anyway, waiting for yarn is not going to hold up the blanket at all. It’s just a little embarasssing.