What I did on my holidays – Part 1 – Yarn

A series of posts coming up on some of the best bits of our recent honeymoon trip to Hawaii. The first and last posts are even going to be craft-related!

I had decided before the start of the trip that I wanted to bring back some souvenir yarn and my plan was to buy a couple of skeins of laceweight to turn into a shawl. Since Hawaii isn’t known for its yarn production, my only preference was for an American yarn that isn’t readily available in the UK.  I checked KnitMap for yarn shops in Hawaii, compiled a list of possible options and then promptly forgot to take my list with me.

Fortunately, Steven had his laptop and we found a wireless connection that I could use and towards the end of the trip, while we were staying in Hilo on the Big Island, I managed to squeeze in a quick trip to the Bernina Yarn Basket. It wasn’t the most attractive or best-organised yarn shop that I’ve ever been to (I still have no idea if there was any system behind where the yarn was stored or if it just got stuck wherever there was space) but I did find a couple of yarns to take home with me.

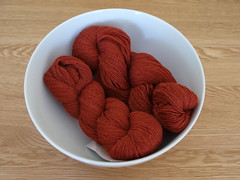
First up were two skeins of Knit Picks Gloss Lace in colour Chipotle.

p1011015 

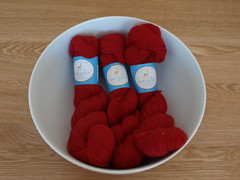
Closely followed by three skeins of Plymouth Yarn Baby Alpaca Lace in the snappily-named colour 2055.

p1011016

I’ve added so many shawl patterns to my Ravelry queue since bringing these yarns home and I still have no idea which ones I’ll end up using. Watch this space.

We heard a great story from the sales assistant in the yarn shop when she found out that we were Scottish. Apparently, her husband’s grandparents were Scottish and emigrated to the States in the early 20th century. They were booked to be travelling out on the Titanic but her husband’s aunt (who was 4 at the time) caught chicken pox the week before they were due to travel and his grandmother refused to travel until she was better. It’s not often chicken pox are considered lucky.

Another amusing story: as we were driving away from the yarn shop, Steven asked if I’d bought enough yarn. I launched into a long explanation of why, even though it was much cheaper than in the UK, I didn’t want to spend much money or have to carry lots of yarn back in my suitcase, etc., etc. When I finally finished justifying ‘only’ buying 5 skeins of yarn, Steven carefully explained that he was only checking I’d bought enough of the ones I wanted to actually make something. Oops!

Conquering crochet

There hasn’t been much posting here recently, which is at least partly due to there not have been a lot of knitting going on around here.

One of the reasons for the scarcity of knitting was pain in my upper arms due to an excess of writing while studying that knitting appeared to aggravate. Since I really need something to help me relax between study sessions, I decided, hesitantly, that I would give crochet another try.

Crochet and I have had a strange history. My first attempt at crochet happened when I decided that I wanted a new cardigan to wear over the dress that I had bought for a friend’s wedding. Since there was only a week before the wedding, I decided that it would have to be crocheted rather than knitted, despite having never crocheted before. So, I picked a pattern, bought some yarn, a hook and an introductory book on crochet and proceeded to start crocheting. One week later, I finished sewing up the cardigan on the train journey to the wedding and wore it to the wedding.

It’s been two years (almost to the day) and I haven’t finished a single crocheted item since.

My problem with crochet (and it is my problem and not crochet’s) is that I’m just not as good at it as I am at knitting. I’m continually having to check what pattern abbreviations mean and then having to check how to actually form those stitches. Until recently, I hadn’t found a comfortable way to hold my hook, resulting in some very awkward arm movements.

But, since I couldn’t knit and desperately needed some form of relaxation whilst studying, I decided that was I just going to have to learn to crochet properly. So, I picked a simple project and, using some bamboo yarn that I had in my stash, started a baby blanket. (The original pattern was for a cushion cover but I really don’t need pastel cushion covers!)

P1010277

Shortly after I started the project, I came across this passage in Jane Austen’s Pride and Prejudice:

“My fingers,” said Elizabeth, “do not move over this instrument in the masterly manner which I see so many women’s do. They have not the same force or rapidity, and do not produce the same expression. But then I have always supposed it to be my own fault—because I will not take the trouble of practising. It is not that I do not believe my fingers as capable as any other woman’s of superior execution.”

Of course, Lizzie is talking about playing the pianoforte and not crochet, but I’m taking the lesson to heart and keeping practising!

Left brain vs. right brain

I’m pretty much a left-brain type person, i.e. good with numbers, logical, structured, except for when I’m very much a right-brain type person, i.e. creative, intuitive and a bit of a dreamer.

Studying for actuarial exams is about as left-brain as it gets and my right-brain appears to have gone into creative overdrive by way of rebellion. First, there was the coffee cosy:

IMG_1180

Then the pirate eye-patch:

Pirate eye-patch

Then a new banner for the blog:

A back-up of my blog banner

I’m quite proud of the banner which is the product of my own photography and GIMP skills. I’ll never be a graphic designer but it’s fun to play every now and again. (All the books in the banner have been digitised, by the way, and are available from Project Gutenberg. The large brown ones are the “Letters of Charles Dickens” and the smaller green ones are the “Fascination of London” series.)

To top it all off, my notebook is bursting with scribbled ideas for new projects and I’ve started swatching for a Spring scarf based on the pattern of raindrops on a window (did I mention the bit about being a dreamer?) and a tea-cosy. In fact, that’s the swatch for the tea-cosy in the banner.

Some day, by which I mean after the exams, I might even be able to put my left-brain to work writing up the patterns for these projects!

How-to: Make a pirate eye-patch

You will need:

  • black felt (2 4″ squares or 1 piece 4″×8″)
  • black elastic
  • thin cardboard (1 4″ square)
  • scissors
  • pencil
  • needle and black thread
  • craft glue

Eye-patch materials

Using the outer line on the template below, cut out two identical pieces of felt. (Tip: double your felt and cut through two thicknesses at once to get them as similar as possible.)

patch_template

(Clicking the template will take you to Flickr where you can download the larger size for easy printing.)

Using the inner line, cut out a single piece of cardboard.

Eye-patch in progress

Sew your elastic to one of the felt pieces, making sure not to twist the elastic before attaching the second end. Back-stitching in the shape shown in the diagram should be nice and strong.

patch schematic

Glue the cardboard to the centre of the felt piece that has the elastic attached and then glue the second piece of felt over the top making sure that the elastic is sandwiched between the two pieces of felt. You may want to add extra glue where the elastic has been sewn to the felt.

Once the glue is dry, your patch is complete. If you would like a neater edge around your patch, you could add blanket stitch all the way around.

Aarrrhhh!

Pirate eye-patch

Not your usual Easter crafting

It feels more like Hallowe’en around here this weekend than Easter. There are no eggs or chicks or bunnies, instead we have pirates and bluestockings.

Pirates because Steven is attending a stag weekend next weekend that requires a pirate costume. Fortunately, we live close to Greenwich which is a good place for buying general pirate stuff and we whipped up a quick eye-patch as well. (Expect a how-to post with full details shortly.)

Pirate eye-patch

Bluestockings was a term coined in the 18th century to describe educated, intellectual women and, with the amount of studying I’m doing at the moment, I think I qualify and now I’m knitting the socks to match.

IMG_1221

These are the “Evening stockings for a young lady” from Knitting Vintage Socks and are a great example of what I love about Ravelry and what I don’t like about Knitting Vintage Socks. There are several lacey sock patterns in the book but none of the socks in the book are photographed being worn. Unfortunately, this makes it impossible to see the lace patterns at their best. So, when I decided to knit a pair of lacey socks, I narrowed my choice down to two by looking at the book and then logged on to Ravelry to see what they actually looked like worn. This actually helped me to decide that I didn’t want to knit either of the patterns that I had short-listed but did want to knit these ones instead. I had never considered knitting these socks based on the photographs in the book but I’m absolutely loving them.

A close-up of the beautiful open-work pattern:

IMG_1227

Cosy coffee

IMG_1172

I would like to present my most recent finished item: a cosy for our cafetière.

It’s hard to explain just how excited I am about this project. It’s a quick, simple garter stitch project using leftover yarn and yet I’m more excited about it than any of the more complicated projects that I’ve knitted recently.

IMG_1175

The reason: I designed it myself. It is the first project that I’ve had the idea for and then actually sat down, knitted and finished it. I have a notebook that I keep ideas for knitting projects in. At the moment, it has notes and thoughts for about 14 projects in it, including this one. Of the others, I’ve knitted a gauge swatch for one and knitted up most of another one but failed miserably to take notes as I did so and have only managed to half-finish the seaming.

So, to actually take this project from initial idea to finished item makes me very, very happy.

IMG_1173

I’ll be even happier when I get around to writing up and publishing the pattern but I have a feeling that that’s going to be much more difficult and time-consuming than the knitting was!

And to show just how simple a project this is:

IMG_1176

Christmas cards

Every year, I like to hand make my Christmas cards. Depending on the complexity of the design that I come up with and the amount of spare time that I have, these either go out to everyone on the list or just immediate family.

This year (like most others) it was starting to look like I wasn’t going to have the time to make any cards at all. However, I managed to find a couple of free hours this weekend and our families will be getting handmade cards.

Origami wreath Christmas cards Origami wreath Christmas card

The wreaths are made of 18-20 individual modular origami sections inserted into each other to form the circle, varnished slightly and then I glued ribbon bows to them and glued them to the cards.

The wreath design came from a book, Origami Jewellery by Ayako Brodek, where it’s used to make brooches by gluing brooch pins to the wreaths instead. If you’re interested in checking out the book, be warned that it’s not for the origami purist! Lots of the designs involve at least a little cutting and gluing although there are some very traditional origami designs including the crane and the jumping frog.

It also has a nice Christmas tree design that might end up on next year’s cards!

How-to: Make beaded stitch-markers

You will need:

  • Beads (I used 2 glass beads and two seed beads to make the markers shown but you can use any quantity and combination that you like)
  • Head-pins (1 per marker)

Supplies for making stitch-markers

Start by threading your beads onto the head-pin. I started with a seed bead because the hole in my larger bead was large enough for the head-pin to slip straight through.

IMG_0943

IMG_0944

Once you have the beads threaded, bend the head-pin into a loop and thread the end back into the last bead that you threaded. You can do this in whatever way you like. I don’t mind if my loops aren’t perfect arcs so I just bend them around my thumb. You might prefer to use a pen or rod.

IMG_0947

IMG_0945

You now have a finished stitch-marker ready to use on your next project.
A finished marker

Have fun experimenting with different shapes and colours of beads.

Beautiful beads

Not content with the huge amount of knitting that has been going on, I’ve been having fun with other crafts as well.

There has been more origami to finish off the centrepieces for the wedding:

00005

And thanks to the wonderful coincidence of a pet shop next to the craft shop, we found the perfect stones for the bottoms of the vases: aquarium gravel!

Also for the wedding, I’ve been working on some beaded jewellery.

IMG_0924

The necklace in the above picture is a vintage piece (circa 1920s) that I fell in love with when looking for something to wear with my wedding dress. The earrings are my own work (circa October 2008) since it became clear that it was going to be nigh on impossible to find vintage earrings to match the necklace. (Turns out that the lady who sold me the necklace wasn’t kidding when she said it was an unusual colour for that period.) Since I have absolutely no experience of beading or jewellery-making whatsoever, I’m really pleased with how well these have turned out.

In fact, I was so pleased with how well the earrings worked that I decided to stop trying to find similar jewellery for my bridesmaid (also an impossible task) and make some instead. (Apologies for the slightly blurry photo.)

IMG_0925

I’m going to change the earrings to make them smaller and more like mine and I may add more crystals to the necklace but I’m happy with how these are looking so far. I bought very fine chain for the necklace because I thought it would look better and without really thinking about how I was going to work with it. Fortunately, I also bought some smaller pliers at the same time so that I didn’t have to keep using the pair from my toolbox!

While I had my beads and beading stuff out, I decided to treat myself to some new stitch markers at the same time:

IMG_0926

I used a really simple idea for these. They are simply a standard head pin threaded through two beads, one tiny, one large and then the end looped back down into the large bead. (The tiny bead is just to stop the head pin sliding straight through the large bead.)

Since I started using these (they show up really nicely against the black of my Sahara jumper) I keep getting asked about them at knit nights. No one seems to believe that they are as easy to make as I say so if I can find a spare 5 minutes during daylight hours, I’ll take some extra pictures and put up a how-to post.

The beads are some left over from the Venezia napkin rings that I made last year (gratuitous picture follows).

napkin ring

Antique Pattern Library

Months ago, someone at Distributed Proofreaders pointed out the Antique Pattern Library website and suggested that they could be a good source of scans of public domain needlework and craft books for us to work on.

Fast forward to this week and it has finally happened! Volunteers from the Antique Pattern Library have agreed that we can process their scans to produce versions suitable for submission to Project Gutenberg.

I’m really excited about this! They have a great selection of 19th and early 20th century knitting, crochet, tatting, embroidery and other needlework books up there. That is a huge treasury of patterns and methods and inspiration and I love that we can help make it more widely available.

The projects are still in initial preparation at the moment but will hopefully be available for proofreading soon.