Vintage sewing machine adventures: part 5 — vintage sewing machine no. 2

Possible alternative title for this post: You need three before it counts as a collection, right?

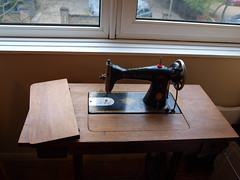
A trip to an antiques and collectibles fair recently ended up with me bringing home another vintage sewing machine:

Singer No. 20 sewing machine

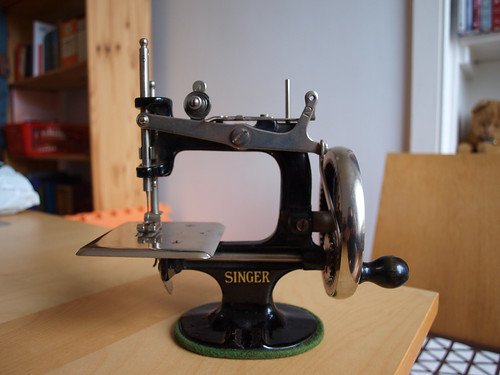
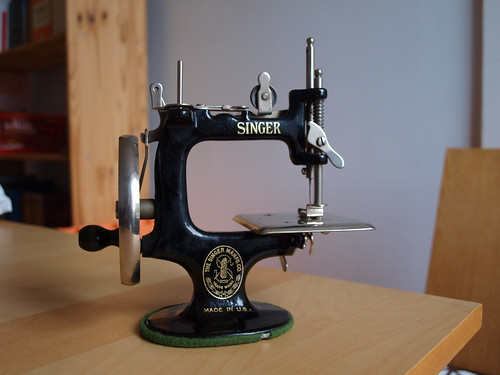
It is another Singer, this time the hand-cranked No. 20. It is probably not clear in the pictures but it’s only about 6″ high since it was designed a child’s machine.

Singer No. 20 sewing machine

Like my first vintage machine, it was in pretty good condition when I bought it and just needs a little bit of oil and cleaning.

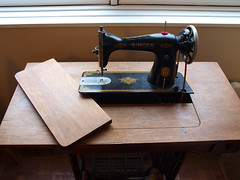
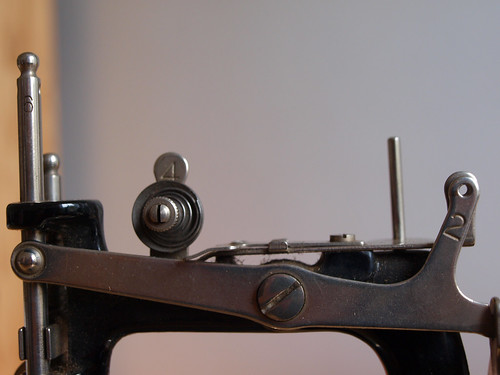
There are lots of nice little touches due it to having been designed as a first machine, like the clear numbers shown below to guide you in threading the machine…

Singer No. 20 sewing machine

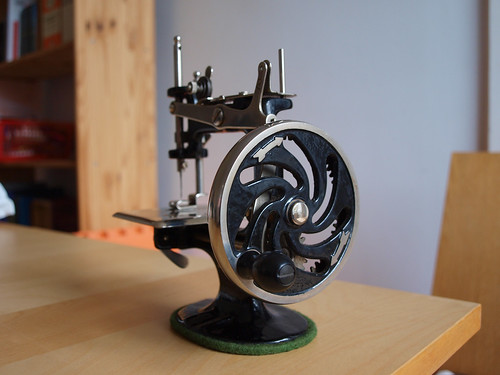
… and the arrows to show you which direction to turn the hand-wheel.

Singer No. 20 sewing machine

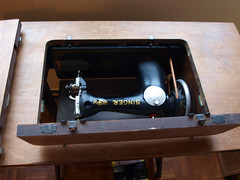
Unfortunately, these machines don’t have serial numbers so they’re not quite as easy to date as the full-size Singers. A little bit of internet research leads me to believe that this machine was probably made some time after 1926 and before the 1950’s so from the same time period as my treadle machine.

One of the best things about this machine is that it still has its original box:

Singer No. 20 sewing machine

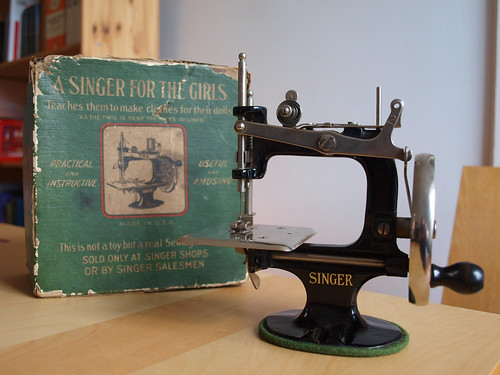
The caption above the picture on the front says “As the twig is bent, so the tree is inclined.” The machine itself is described as being both “Practical and instructive” and “Useful and amusing”. I certainly hope so!

Singer No. 20 sewing machine

Playing tourist, part II (with knitting and sewing content)

We’ve been doing sort of the reverse of our Cutty Sark tourism this weekend. We’ve been up in Scotland, exploring the area that we are moving to. We are going to be living near Stirling, which is a beautiful, old Scottish city that mostly looks like the picture below:

Stirling

I spotted both a yarn shop and a fabric shop in Stirling but they were closed when we were there on Sunday so I didn’t get to look around. However, I did find a whole selection of cheap knitting and sewing books in one of the discount bookshops in the city centre. I managed to restrain myself and only bought two.

First was Fitted Knits by Stephanie Japel. I bought this mainly for inspiration and the section with hints and tips on customising patterns since few of the patterns would actually suit me, particularly in the heavier yarns that most of the patterns call for. It’s a beautiful book though and easily worth the £3.99 that I paid just for the photography!

Fitted knits

I’m hoping to get more use out of the second book which was Sew U Home Stretch by Wendy Mullin. I’ve heard really good things about the Sew U books and I’ve been wanting to have a go at sewing knit fabrics for a while since I’d love to be able to sew my t-shirts and tops for work. The patterns included with the book don’t go big enough for my bust size but there is plenty of discussion about how to apply the principles in the book to ordinary commercial patterns. There is even a section on making your own patterns from existing items that you love.

IMAG0047.jpg

If we weren’t moving I would love to have taken the class on sewing knits that The Make Lounge are introducing but the first class isn’t until October so I’ll just have to make do with the book and the internet for now. I’ll let you know how it goes!

The finishing touches – sewing edition

I was taking some photos of our flat in its “finished” state the other day and realised that I hadn’t blogged about some of the things that I’ve sewn for it.

First up: roman blinds for Steven’s study. My thought process went something like this: custom blinds are quite expensive; blinds are just rectangles, really; I know other people who’ve sewn their own blinds (my mother-in-law who has at least 3 decades, if not 4, more sewing experience than I do); my big sewing handbook has step-by-step instructions; how hard can it be?

Roman blinds

Roman blinds

The answer: reasonably hard but, in the end, actually achievable.

Study

They’re not perfect but I’m pretty damn proud of these.

I went through a similar thought process when I saw some table runners on a display in IKEA. For once, this project turned out to actually be easier than expected since they were selling the fabric with the side edges pre-hemmed so all I had to do was cut it to an appropriate length and hem the ends.

Dining table set

Deciding to then use the same fabric to make matching seat cushion covers was a bit more complicated. The chairs had come without cushions and really aren’t that comfortable without them. It’s surprisingly difficult to find plain square chair pads without ties and the ones with ties just aren’t shaped to fit on chairs with solid backs. We did manage to find some (IKEA again) that had velcro straps that we cut off but they were bright blue so really needed to be covered.

Dining chair cushion cover

I didn’t have a pattern or instructions to follow for these so just sort of made it up as I went along. I cut the hemmed edging off the fabric and cut  squares for the top and bottom of the covers from the geometric pattern centre strips. By undoing the hemmed edging and ironing it flat, I got a nice wide strip that I used for the band around the cushion. I then assembled these as very narrow box cushion covers with an overlapping envelope type opening on one of the narrow sides. Since these sit against the backs of the chairs, it doesn’t matter that they’re a little flappy and don’t stay perfectly shut.

Again, the result isn’t perfect but they do look good along with the matching runners and, hey, at least they’re not blue!

Vintage sewing machine adventures: part 4 — putting the machine away

Someone asked for details of whether or not my vintage Singer machine folds into itself so I thought I’d take some quick photos to show how it works.

The “extra” bit of wood in the picture below usually attaches to the left-hand side of the table when not in use. Otherwise the picture shows the machine set up for use.

Vintage Singer sewing machine

The machine tips back slightly so that the piece of table-top in front can be lifted.

Vintage Singer sewing machine

With that out of the way that machine swings right down into the body of the table.

Vintage Singer sewing machine

With the machine inside, the first piece of the top can be replaced.

Vintage Singer sewing machine

Then the “extra” bit fits into the remaining space to complete the table-top.

Vintage Singer sewing machine

I’m slightly ashamed to admit that this is how the machine currently spends most of its time. I did get a quick lesson in how to use the treadle last time my mum visited so I just need to find the time to practise.

Log cabin cushion cover

Back in March (which feels like a very long time ago) I attended another Make Lounge workshop. This time it was their Log Cabin Quilted Cushion class.

The class, like all the other Make Lounge classes that I’ve attended, was great. The tutor was really friendly and helpful, the other students were nice and I find learning new techniques from an instructor is so much quicker than trying to track down tutorials on the internet or understand directions in a book.

Even so, it’s still somewhat surprising to me that I managed to sew an entire quilted log cabin cushion cover in around 3½ hours having never quilted before.

Log cabin cushion

I’m not completely happy with my fabric choices. Faced with a wall of fabric rolls and a limited time to choose, I tend to panic and rush my choices. I also tend to prefer single colours and solids rather than patterns so trying to select from heavily patterned, brightly coloured quilting fabrics is very difficult for me.

Some of the fabrics, however, I absolutely adore. This one is my favourite:

Fabric scraps

Unfortunately, I have no idea what it’s called or who it’s by but I love the furniture images.

My other favourite was this one:

Fabric scraps

I’m just so much of a numbers person that I couldn’t resist when I saw it on the shelf.

I do love the finished cover though and find myself wishing that I had more uses for cushions as I would love to make loads of these!

Retail therapy

I said I wasn’t going to post again until after my exams but I wanted to show off the packages that arrived this morning. I indulged in a little retail therapy while I was ill and everything arrived at once.

Gingham invaded

First up, some brilliant fabric from Voodo Rabbit. Steven showed me a post about their cushions on Boing Boing and, when I saw they had fat quarters of the fabric available in the their Etsy store, I just couldn’t resist. I bought a fat quarter each of “Gingham Invaded” in white on black and black on white.

Gingham invaded

I have no idea yet what I’ll do with this. Steven is talking about getting some for himself to make another dice bag. I’m somewhat tempted to order lots and lots of it from Spoonflower and make my own cushion covers or a quilt!

On a far less geeky note, I also bought a shawl pin from South4th on Etsy. I keep seeing their Ravelry ads and had been trying to resist but being ill lowered my resistance and I succumbed.

Shawl pin

I’ve wanted a new shawl pin for a long time but was looking for something small and reasonably plain, whilst still being pretty. The myrtlewood pin fits the bill perfectly. It’s beautifully light, the oiled finish is gorgeous and it looks great with my shawls. Unfortunately, all the shawl pictures I took were out of focus so you will need to wait for better pictures of that.

Now, back to the books!

My desk

Geeking out (again)

I have worked on two unbelievably geeky projects recently.

Riemann surface neckwarmer

First up was a Riemann surface neck-warmer. I’m not going to attempt to explain the mathematical properties of a Riemann surface (not least because I’m not sure that I really understand them anymore), check out Wikipedia if you’re really interested. The point is that they’re really quite pretty and very geeky. There was a discussion on the Ravelry Geekcraft group about how you might knit one and then Behavioural Geek came up with a  pattern. This coincided almost exactly with me thinking that I could do with a new scarf, neck-warmer type thing and that I still had rather a lot of the Noro Cash Iroha that might work nicely. The result — a lovely, soft, warm, exceedingly geeky neck-warmer. I modified the pattern slightly (details on my Ravelry page) but I’m not very happy with the way that I grafted this so I’m thinking about re-knitting this so that I’ll be happier wearing it.

Second project — a dice bag:

Dice bag

This one wasn’t for me, in fact, this one wasn’t even all my work. Steven bought some new dice at a role-playing convention recently and mentioned that he could do with a new dice bag. Since he had also expressed an interest in maybe learning to use my sewing machine at some point, I got him to do all the machine-stitching while I did the hand-stitching.

Dice bag

We used a tutorial that I found, although our bag is much smaller and doesn’t have a little heart appliquéd on it since, for some reason, Steven wasn’t very interested in having a little heart on his dice bag. I also use two cord loops rather than one to make it easier to close the bag.

Dice bag

The fabric is “Stripes” and is one of the limited edition prints from the Quilts: 1700-2010 exhibition that was at the V&A last year. It is actually the first piece that I’ve used from the pack that I bought after I had been to see the exhibition last year. This particular print is based on a fabric used in a patchwork quilt from the late 18th century. (Don’t shoot the messenger but the fabrics associated with the exhibition are currently on offer in the V&A shop!)

“I could just make one.”

Steven and I did some rearranging recently so that the room that was my study is now our bedroom and what was our bedroom is now my study. There are still some problems to work out, but the biggest was the fact that all of our bed linen clashes really horribly with the colour of the walls. The plan is to change the colour of the walls at some point but, as I’m just six weeks away from my next set of professional exams, that is not going to happen for a couple of months at least.

Enter Bright Idea #1: “We could get a bedspread that matches the walls.” So, we looked for a bedspread and they were too big or too small or the wrong colour or the wrong texture and, almost always, really expensive.

Enter Bright Idea #2: “I could just make one.” Usually, those words are a sign that I’m going to spend a lot of money on supplies, start the project, find it takes more time than I expected and end up with a half-finished project somewhere that makes me feel guilty every time I stumble across it. <Looks across room at three dining chairs with cushion pads and one without.>

But not this time:

Bedspread

This time, I bought the fabric (a lightweight herringbone twill), went straight home and sewed until it was done.

Bedspread

I didn’t do anything fancy, just stitched two lengths together so that it was wide enough and then hemmed all the way around. I didn’t bother backing it since the twill is two-sided but I did take my pinking shears and tidy up all the hems. Since I used approximate measurements from the sizes of bedspreads that we had seen for sale plus a margin for safety because I wanted the bedspread to go all the way to the floor, it is actually a bit big. It is however finished and does exactly what we wanted it to do and I love it!

Cause and effect

It seems that the more I knit and sew, the less I blog. Or, is it that the less I blog, the more I knit and sew? Whichever way round it is, there has been very little blogging but a lot of crafting going on.

In the month since I last blogged, I knitted a baby cardigan, finished my Simmer Dim shawl (although it still needs blocked), designed and knitted a hat and matching fingerless gloves, finished a neck-warmer, and sewed a log cabin quilted cushion cover.

I also made quite a bit of progress on the border of another shawl, started another hat, and started sewing a bedspread.

Having written all that down, I’m starting to wonder when I had time to work, sleep and study!

Lots more details to come on all of these but the only one I have pictures of at the moment is the baby cardigan.

a picture for you

This is the Kira cardigan from Harumidori designs and it is absolutely adorable. I wasn’t a great fan of the layout of the pattern document, which was very cluttered and difficult to read, and there were a few typos in the text although I didn’t spot any actual errors in the numbers. I love the finished cardigan though. I knitted in Rowan Pure Wool Aran, which was really soft after washing and blocking but I’m a little worried that some of the red dye ran during washing.

It’s a bit big for the baby that it was given to since he was only 10 days old when we saw him but I had knitted the 6-12 month size.  However, he was wearing the baby hat that I had knitted for his older brother about 2½ years ago, which is apparently still going strong and is still his mum’s favourite baby hat. This was the beanie hat from Natural Knits for Babies and Moms by Louisa Harding. The RYC Cashsoft DK has held up really well with washing, is still really soft and apparently the sizing and fit are just perfect for newborns.

img_0850

It’s very satisfying to knit gifts for people who really appreciate them!

Barcelona

Not the city (unfortunately) but the Amy Butler skirt pattern. Back in October, I attended an “A-line skirt workshop” at the Make Lounge in Islington and this is the result (excuse the not-brushed-my-hair-or-put-any-makeup-on picture).

Barcelona skirt

I love this skirt. It has somehow ended up being a little big, despite fitting perfectly when I tried it on at the workshop. It’s still perfectly wearable though so I haven’t bothered trying to take it in at all.

Barcelona skirt

The fabric is a red gabardine from John Lewis and is slightly heavier than the cotton that is suggested for the pattern but is the perfect weight for a winter skirt. The lining is a not terribly interesting grey/lilac polyester which I mainly picked to be a nice contrast.

IMG_0211.JPG

I really enjoyed the workshop. The pattern is well-written and easy to follow anyway but, since this was my first time trying to make anything from a pattern, it was great to have someone there to guide me. I learned how to adjust the pattern to fit my measurements and a neat way of shortening a skirt pattern (particularly one that claims it only makes one length). As always with the Make Lounge, the evenings themselves were good fun, a couple of glasses of wine and some good company can make sewing a surprisingly social activity.

There is a guilty secret attached to this skirt though:

Barcelona skirt

It’s not actually finished! There is just a very little hand-sewing left to do to attach the lining to the zip and to add a hook and eye at the top of the zip. Unfortunately, neither of these things are visible when the skirt is worn so I’ve been wearing it lots anyway and have very little motivation to do the finishing. Maybe now that I’ve admitted my laziness to the internet, I’ll finally get around to finishing it properly.